Tuesday, February 24, 2015

Lessons I've Learned so far About Blogging

It was on the heels of whim: one day after studying about blogging for the OMCP certification, I decided to start one.

While I sit here and watch the snow fall behind me out of the reflection of my computer, I have a little time to think about writing and blogging. I'm looking back at what I've learned so far while blogging for, essentially, 9 months.  Throughout these past nine months, my posting consistency definitely has not been as active as I would like; that's a large lesson I've learned.


1. It's Quite Time Consuming

I currently work full time at NC State University and am a Master's of Business Admin. student at ECU. These two things alone take up the mass majority of my time. Throw in a blog and basically all of the extra time that I have is gone (but I am NOT complaining.)  Some people think that blogging is not a job that can cast up to 40 hours of work per week. But when your posting 5 - 7 times a week, networking and advertising, it can add up to more time than that.

Networking, following other blogs, interacting with other Blogger's postings, advertising and posting/writing new content is time consuming. I personally know that I do not devote as much time to it as I need.  But after work and homework each day, the hour that I devote to myself (normally dinner time) is the time I want to use to relax. But after school is over, I plan to get writing and working on this blog, fully!

2. It Can Be Hard to Create Shareable Content 

"Better content doesn't always mean a better blog." I remember this daily while I read, write and interact with other blogs. Although content is a MAIN aspect to blogging, having better content does not always mean your blog is "better."

But getting to that point can be difficult. Finding a niche content market or blog realm can be tasking. For people like me, who love a lot of things, it can be hard to settle down and figure out the main shareable content on your blog.  Once that is actually accomplished, it can be even harder to create that content. I don't cook well and I don't read many books (outside of school textbooks). I can write and write and write, but I also get to a point where I feel nervous that my content isn't great, then delete.

3. Writing Isn't as "Easy" as School Essays Make it Seem

I can write and research for days on end when it comes to specific graduate research project topics (provided by a teacher.)  But when it comes to writing about topics I really love, there are times I can hit a (large) brick wall.  Although I do love to research and write papers (I know, I know. What a weirdo.), I would love to be able to write about what I love easily. I want to do what I love justice and writing about it can, sometimes, not be easy.

Not to mention, creative writing is very different than research writing. I love research writing. I love writing in general. I just HATE those brick walls.

4. Online Networking is the Best Thing a Blogger Can Do

Social media, blogging forums, groups, etc., are essential. The blogging community is fantastic. There are many individuals out there who are WILLING to help you with your blog! If you're in NC, check out NC Blogger Network. Such a WONDERFUL blogging community of local bloggers willing to help and collaborate with you (with wonderful content at that!) Establish a community and use that community! They are a great resource.  Most bloggers are willing to help and are very pleasant individuals.

5. Search Engine Optimization (SEO) Isn't as Easy as the Books Make It Look

Books can tell you all you want to know about Search Engine Optimization, but it cannot show you how to do it (some books try, really hard.)  It's a very difficult process. But when it works, it works. It is a true learning experience, with a lot of intricate topics, twists and turns (but if you know me, you know I do love to learn.)  It all roles back to great content and social interactions.  Link sharing can be difficult, but great content can help that.


When all is said and done, blogging has been and will continue to be a wonderful experience. I've gotten way more views than I could have possibly imagined (even if many of them are from family and friends.) I've even made a little bit of  money ($2 dollars currently... I know, not a lot but that's something I'm proud of as well!) Blogging has been a learning lesson and I'm glad I've ventured down this road! One day I will transfer to WordPress, but that will be after schooling is over.


Monday, February 16, 2015

DIY Glitter State Cut(e) Outs

^ See what I did there? :)

Welcome to another session of Do it Yourself with a Little Help From Your Friend (aka: me c") (PS: I'm feeling a little froggy, I've had a nice glass of Zombie Zen Zinfandel wine. Not the best wine I've ever had, but with a nice melted ice cube, it's alright.)

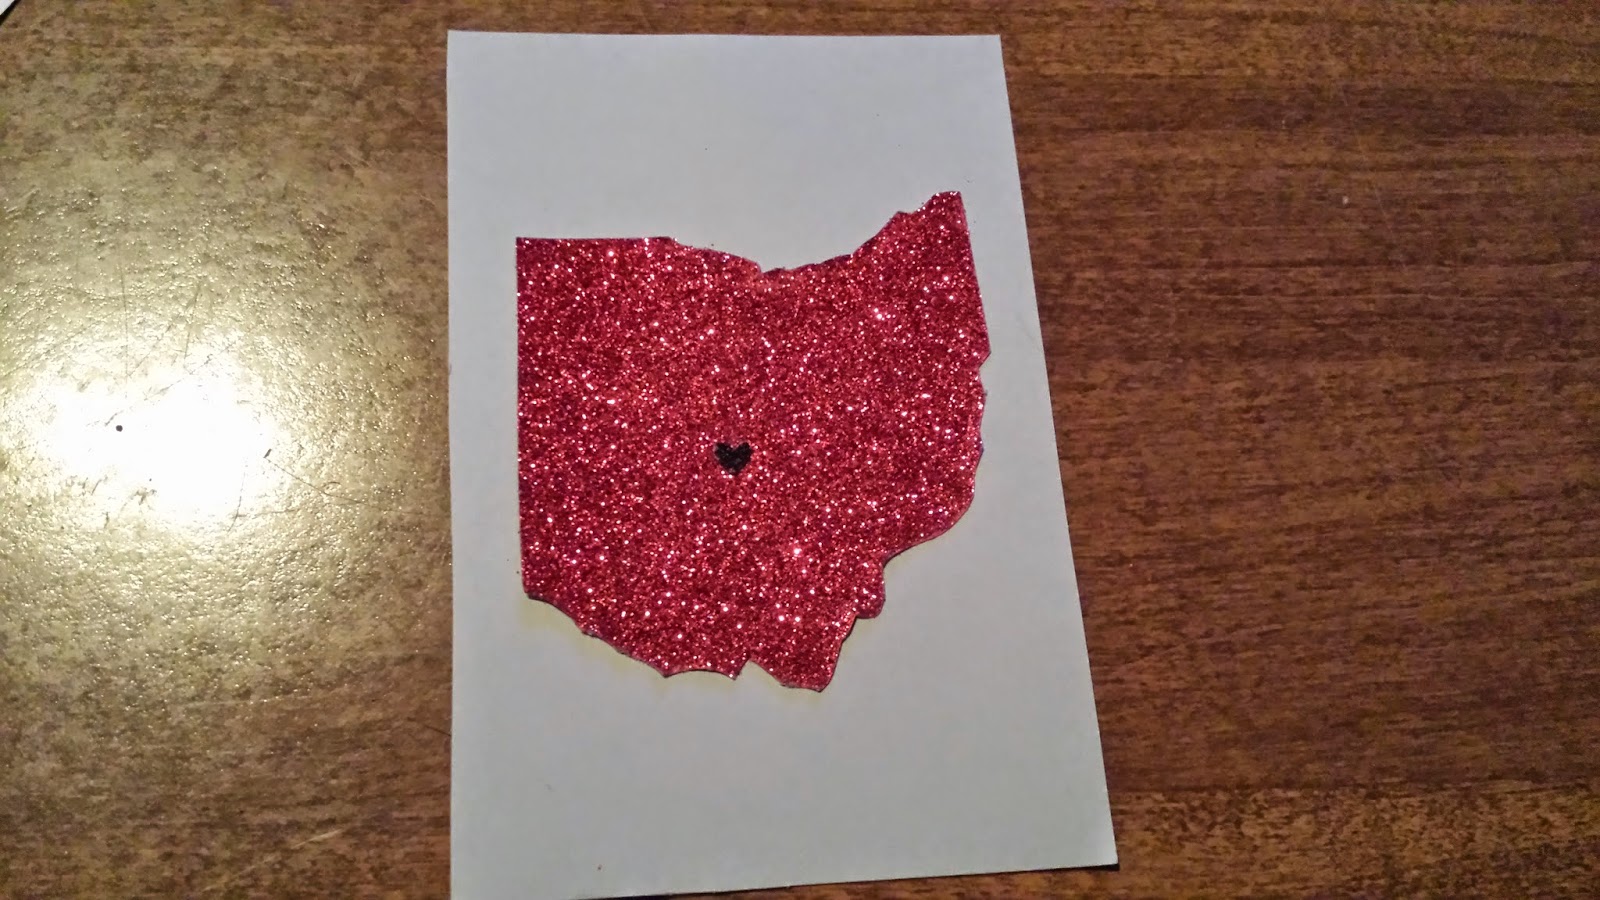
This is what we'll be making tonight:

DIY Glitter State Cut Outs (the easy way.) 

(disregard the "HOME." That was a separate DIY Photoshop project I did for my sister and brother for Christmas.) 


As you can see, I made quite a few of these bad boys. Including letters to go along with (OH!)  The letters were the hardest thing to accomplish because of how tight the corners were in cutting. I had to use small hair trimming scissors in order to get them that tight. 

Now, I know what you're thinking: "Shanna! We've seen a MILLION of these online!" Yes, I have too (that's why I made them!) But none of them (that I've seen personally) take the simple way out... I did. And it was... simple. :) A lot less struggle, heartache and headache (and cheaper too!

So, here's what you'll need: 

  1. One package of card stock paper (or enough to suite your color needs): I used this. Great thing about this package is you can use card stock to make a TON of DIY projects! Including personalized greeting cards. 
  2. The colors of glitter card stock paper you'd like your state to be. (Highlighted and underlined for your viewing pleasure.) I cannot find a link to this on Michaels.com [hate their website] but my local Michael's sales GLITTER CARD STOCK! [makes this project 100 x easier.] 
  3. Scissors 
  4. Printer paper and printer (unless you're an expert freehander) 
  5. Glue 
  6. Picture frame (sold separately.) 

With all of the necessary items in tow, let's get to work! This project should take all of 15 minutes (if you're a swift cutter.) 

Firstly, you'll need to find which state (or letters) you'd like to make into Glittertastic versions of themselves. Print these onto computer paper, to the appropriate size you'd like. I used a nice shade of red glitter card stock (pictured below) for the Ohio State Buckeyes! Carefully trim around the edges of your printer paper cut out. 


Flip your glitter card stock over and trace your letters / state onto the back. A typical size glitter card stock gave me two sets of letters and one state (which fit nicely into a 5" x 7" frame.) Now cut. 


WASN'T THAT SIMPLE? No need for hair spray or messy mod podge. The letters / state come out glittery from the get go. 


The last step is to glue your state and letters down. I did this onto another sheet of card stock (hence the purchase of a package of colors.) For an added touch, you can cut small hearts (of a different color) and add them to the hometown of your loved one, or at least into the general area..


Once dried, place into frame and wrap! That simple!


I'm all about the simple -cough- cheap -cough- way of doing a DIY project.  Stay tuned for more projects (like this one) once we move into our house! I've got a lot of blank walls and a lot of repainting to do, so we'll see what turns up. :)


Thursday, February 12, 2015

What a Month, What a Month.

It's been almost a month since my last posting, and I'm deeply sorry about that! Between work, school and some other SUPER EXCITING news, I've been ultra busy and unable to write about, well, anything.

With school underway, I can feel the stress and pressure building back up to the level it was at last semester, only a bit worse as the courses I am taking are making no sense at all (at least one of them.)  However, I've found something that gives me solace in a time of great stress: working in a university setting.  Working at the ASSIST Center on NC State's campus is proving to generally be what I wanted.  I'm happy with the work I am doing, overall, but I am mainly happy to be on campus having the interaction with brilliant minds, students and professors on a daily basis.

Updates

I wish I could say I'm doing great on the GOALS that I set for myself in a previous posting.  I severely cut down on the soda but I was unsuccessful in drinking none for the two month time frame I set for myself (which is still currently happening.)  I will not be drinking any for the rest of the month! 16 days... That's got to be easy... right?

Next month, however, is going to prove much more difficult than I had originally thought... I've already cut out a lot of pasta (which I am very sad about..) but having absolutely no wheat products in my diet is going to be difficult. Many of the vegetarian protein sources that I eat have wheat products mixed in.  I may have to modify the 2 month span from "no wheat" to no "added wheat products" such as pastas, breads, etc. I cannot cut out my sources of protein..

I've been attempting to track my macros, push myself as hard as I can at the gym and not focus on the scale but rather how I feel about myself. I don't see a lot of change happening yet, but I've started an Instagram for my fitness: sr_fit. Follow me to keep up with my progress!


BEST NEWS OF ALL 

I've been waiting WEEKS to tell everyone and I just can't wait any longer. I'm so super stoked on the news (much more stoked than I've been in a long time.) 

WE'RE BUYING A HOUSE 
(aka: we've already bought it and we're waiting on the final appraisal for final loan approval.)

We are very, very excited. The house is brand new, slated to be finished next week.  We are taking our first initial walk through next week and we're scheduled to close (as of now) on March 13th. HAPPY VALENTINE'S DAY AND BIRTHDAYS TO US! Below are pictures of the outside of the house. Inside of the house is for only certain eyes until our housewarming party. :) 

Initially we couldn't tell how large the lot was going to be, but turns out the front and back yards are both HUGE, along with a driveway that can fit at least 6 cars. 


5 Tips I Wish I Had Know About Buying A House

 It's hard. I'll give you that. As a first time homebuyers, there were a few things that we just didn't know to ask or know about loans. We found solid answers online and through my parents (my step-dad builds houses and my mom is in the home mortgage industry, convenient right?), but I thought I'd share a bit of our "knowledge bombs" with you (this is a blog posting, after all.)

1. Wait. 

The first house you like might not be the right one. Don't settle. My boyfriend and I almost did just that. We found a house and our Realtor told us we needed to move fast (see 5).  I think we were both okay with settling where we were.  The neighborhood was nice, but the more we began to think about it, the more we didn't want to live there.  We talked it out over lunch and decided that putting an offer on the house (we thought we loved) just wasn't the right move. We talked to my parents and they recommend we look in their neighborhood. There were only a few lots left, it was the same distance to where we were looking previously, and the houses were brand new.

AND BADA'BING, we found it! Brand new house, in our budget and the size we wanted WITH room to fence in the back yard (to get a dog, big thing for my boyfriend and the other home did not have.)

2. Make sure you have everything, plus some. 

This tip comes from my mom, mainly.  When you're applying for a home loan and going through the underwriting process, make sure you have everything you need (pay stubs, income records, etc etc.) and then throw some more on top of it.  My boyfriend made the mistake to read underwriting horror stories (DON'T DO IT. There are some really nasty stories out there. :[), so we made sure to have over the top information to provide to our underwriter. So far, so good (knock on wood, "yet" and all the other terms to throw in for superstition.)

3. If it's new, be extremely picky. 

And this tip comes from my step-dad. He's built homes or worked in new home construction for most of his life.  He's been the 'man behind the mask' on many different types of family home construction. His tip to us: be extremely picky when it comes to "flaws" in your home. You're paying good money for a brand new house and the home itself better be worth it. Down to the last small nick in the beam on your front porch. Write it all down, take notes and have them fix it before you close.  You are, after all, their customer. They should be concerned with good customer satisfaction.

4. Get pre-approved / pre-qualified. 

A simple step that can make all the difference in the world.  There are many benefits to getting pre-qualified.

  1. If you don't get pre-approved, you have the possibility to fall in love with a home that sadly you cannot afford (according to the bank.) That's dangerous and can be really damaging to the spirits.  
  2. You have better leverage when putting in an offer because you already have pre-approval for financing. You're over those who do not have financing yet. You know what your upper-most limit is in order to judge if you can afford to wiggle with the purchase price.  Negotiation will be easier.
  3. If it's your first time buying a house, getting pre-approved can shed some light on what to expect at closing and the fees associated with that... I know I was surprised. 


5. Be prepared to move fast.. extremely fast. 

From the time we started looking, found our home, put an offer in, negotiated and got our offer accepted, it was a total of 4 days - 5 days. 5 DAYS. That's very quick.  We found 3 houses online that we wanted to look at before we found our house and 2 of them were already off the market (one within a DAY of being put on the market.)  It's a large decision and to make it in 5 days is extremely hard, but in order to get the house that you want, you may have to move just that fast. 


I'll keep you up to date on our home buying process, and then after we move in ALL THE DIY PROJECTS I'LL BE DOING. :)


Thursday, January 15, 2015

The Most Magical Experience - Part 2

A few weeks ago, I wrote about part of one of the most magical experiences in my entire "lifetime" (because that's been such a long.) I visited The Wizarding World of Harry Potter with my boyfriend for our first year anniversary.  It was a fantastic and magical experience; the rest of Orlando Studios and Islands of Adventure was alright too.

Last time, I wrote about Diagon Alley.  This time, Hogsmeade. I wasn't afraid to say it last post, and I'll say it again. I almost cried multiple times because I was so excited to be in a place that replicated some of my most fondest memories of all time.

Train Station, Platform 9 3/4, and the Train Ride: 

Cried, tears of pure joy.  It's was very, very perfect. They had a section of the station where when standing at one point, it looked like people were actually "running" through the wall to get the Platform 9 3/4 (and it really looked as if they disappeared, it was pretty awesome.)  The train itself was great! 

The train ride, which goes both ways, has a video that plays through the "window."  A different video for each ride (one for the way to Hogwarts and the way back.) Some very fantastic footage! It also has the three (Harry, Hermione, and Ron) walk past your window. I was sad, however, because I'm guessing Emma Watson didn't have time to come record her voice. The voice actor they used sounded nothing like Emma. :( But still, overall it was fantastic. 


Off the Train, to Hogsmeade: 


Still crying, by the way. It was so wonderful.  As soon as I could see the castle over the top of Hogsmeade village, I cried.  The snow cover roof tops, the cobblestone streets, Hogs Head, the stores, the butterbeer: everything was perfect. It was so well laid out and so well thought out.  Walking through Hogwats castle was such a great experience. I wanted cry again, but there were too many people around that time. hah. Walking through Hogwarts castle is actually a ride at the end. I don't really remember much of the ride (because it's been 2 months now,) but I know the castle was very in line with what was show in the movies. Some of the most iconic relics of the books/movies were in the castle.

Hogsmeade was also the portion that actually had roller-coasters. As these parks are "theme parks" and not "amusement parks," many of the rides were 3D type rides. We didn't enjoy that, but the Harry Potter ones I went on anyways because... I mean... it's Harry Potter.  The Flight of the Hippogriff roller-coaster, however, was great.


Breakfast at The Three Broomsticks

As I mentioned in my last post, our vacation package came with 2 meals per person; one at the Leaky Cauldron and another at The Three Broomsticks.

Both restaurants were fantastic, but this one was more of a order and serve, "fast food" kind of restaurant. You order and have your food before you leave to get to a table. I like the idea of the Leaky Cauldron better, but the food is the same at both restaurants.  Both my boyfriend and I ordered something different than we had previously to test out the menu more. Both meals were fantastic. I had  more fruit than my stomach could handle and it was very fresh.

Florida in late October was fantastic weather wise, so little birdies were flying in and out of the restaurant. It was actually quite funny.


If you want to see more pictures, please visit my Facebook page. It was a great experience and I took hundreds of pictures. I just did not want to overload my load times by putting them all here. :)


Tuesday, January 6, 2015

Paint by "Numbers" - DIY Cornhole Boards!

Yet another wonderful Christmas present that I crafted (or well.. partially crafted!)

This is more of a partial craft rather than a DIY.  The expense to buy the wood, power tools and nails/etc. was equal or more than purchasing a pre-crafted set from: Cornhole Express.  The individual here made the quickly and very sturdy!  If you're in North Carolina and you want a good set of Cornhole boards (purchase or for rent) you can get them here!

So I purchased and I painted! I took a general look at these guys here: Cornhole How To to help with a basis of what I would need and how I would need to do it!

What you'll need (without making them yourself):

  1. Set of pre-fabricated wooden cornhole boards
  2. Wood filler and Sand paper (medium) (only if your maker did not do this for you)
  3. Paint brushes and paint rollers (there is a great set at Home Depot for around $10) 
  4. Pint of Wood Primer; I used grey because the nice man at the store told me it is the easiest to cover over
  5. Paint! I actually used Gilden paint samples (5 different ones: scarlet (x2), grey, black and white) and it was enough. Which is great! They are very cheap (about $4 a piece for a sample rather than a pint/quart)
  6. Painter's Tape is a must 
  7. Ruler 
  8. Something to hold your boards off the ground; I used plastic cups
  9. A general idea of how you want your painted boards to finish
  10. Logo/decal to put on your boards, if you'd like one
  11. 1 pint polyurethane


Fill any wood holes and sand down. Prime your board and let it dry! I did this the weekend before I painted because I had to paint them at my mom's house (my apartment just didn't make the bill.)


Now start the painting! I laid down the general basis for the grey first, as the nice man said it was the easiest to cover.


Let that dry fully. Put the painter's tape down and throw another layer of paint on top of the last layer! 


Then through the white on top of the same tape.


I had to only pull the side layers of tape off because I had an extra layer of paint to add. The black was difficult but I managed (but did not take a picture of the extra layer of tape I had to lay down.)


The final paint results were great! I was super happy. My mom really helped me get everything straight. You cannot have crooked cornhole board paint! That just throws the whole game off. 


 Make sure you put your decal on before the polyurethane.  Put a good coating of polyurethane over the top, let dry then add another coat.


My boyfriend loved them as a present (at least he said he did!) And very simple to paint. I'm sure the crafting of the actual board sets was a bit difficult, but Cornhole Express is here to help that in North Carolina (and a few other states, I believe.) 


Sunday, January 4, 2015

DIY Image on Canvas - With a Twist!

Now that Christmas is finally over, I can share all of the DIY projects that I crafted as presents! I finished most of these in September (I think) so I've been waiting a long time to be able to release these posts!

I want to start with the DIY Image on Canvas(es) that I did. I made quite a few of these because they are SO easy. And I mean EASY! 

What you'll need: 

  1. Canvas (of any size) 
  2. The Image you want
  3. Mod Podge
  4. Foam Brush 
  5. Newspaper (or another form of paper to put underneath the craft) 
BONUS: 
  1. String of battery operated craft lights
  2. Batteries 
  3. Staple Gun and staples

Easy, peezy lemon squeezy project!  Once you've gathered all of your materials, lay out your bottom layer of paper. Since Mod Podge dries very quickly, you really need not worry about your canvas sticking to the paper. But it is always a good idea to keep on the lookout for that.

I started with a 6 inch x 6 inch canvas. I got an extremely good deal on a pack of 4 at Michael's during one of their sales. It was buy one get 2 free. So I ended up getting 16 6 x 6 canvases, most of which are gone now!


 Either print your picture or take one (from whatever source you'd like, unless for resale, copyright laws and all) that is on a piece of printer paper (I found this was the easiest.)  I simply filled in some edges in Photoshop and used the picture below, printed on 8 x 10 paper from my at home printer!  The photo was taken by Richard Byers.

Lather up both the canvas and your image with Mod Podge and gently lay the image in the area where you want it to be on the canvas. Since I wanted mine to wrap around the sides, I widened the image a bit (7 x 7) to fit around the corners.

Quickly and firmly press the image down onto the canvas. From there, I flipped over to ensure it would dry together properly. This only took about 2 minutes.


Trim the edges of your image, if necessary. If you do not have an image that runs off the page our you simply put a cut out in the middle/corner, skip over the next little blurb. 

If your image wraps off the canvas: Then flip and cut the corners of your image up until you meet the canvas, just as in the below image. Lather both the side of the canvas and the back of the image/paper. Fold the two together and move to the next side. Do the same for each side. this will make your sides fold onto the side next to it, creating a nice, snug grasp.


After that is done, you'll take your Mod Podge and run a thin but generous layer across both the top of the image and the sides of your canvas to ensure the image looks "glossy" and stays in place.

Do NOT get discouraged at the image starts to look like wet paper like the third image below (because it is wet paper.) When the Mod Podge fully dries (which can take from an hour to overnight, depending on how much you lather on), it will pull tight again! I was pretty upset the first round of images, but the next morning everything was tight and the image looked great!


 Here are some of the other images I did. If you've seen/read my Window Mirror DIY tutorial, then you've already seen the blue stripes. I needed something linear to go in my work office!  The others were just a nice add on to the top of my desk at work, as well.


BONUS: 

For some reason I did not take  images of the canvas of my family and I after it was complete. :( I added a string of battery powered craft lights to the back of them which illuminates a pretty good distance! 

All you have to do is staple them to the back so that they do not light the middle of the canvas. Point them facing out.

Here is an image of the back of another craft project that I did with canvases (just painting, nothing too difficult) with the string of lights attached to the back. I pointed these ones in so they would light up the white section of the canvas, but it is the same general premise! Instead of making them point inward toward the canvas, just staple them around the outer edges to illuminate outward! 


 I made quite a few of these for Christmas. They are easy, simply and quite inexpensive but have a great deal of meaning because you can easily personalize them!